Tuesday, March 29, 2011

Playing With Major Scales

Since no one usually asks us to recite the C scale, let me show you how it is typically played; though for the record, I think it best if we try and recite it more often. 


 Before you play it, try and count the steps.  This gets a little tricky when we travel across three strings.  As I showed in the last lesson, if the scale is played on one string the pattern 2+1, 3+1 is easily recognized but not in this form.  That is why you have to memorize the notes in the scale and their steps.

If someone is playing in the key of C, this is the scale to use to kick out a lead riff.  Now, I admit that it won't make you sound like a master of licks, but let's face it you are building up to that level.  (A helpful hint is that you do not have to play this scale in order, you just have to make sure your notes are being complemented by the chords played by your accompaniment).  For some of us, our fingers and minds have already learned this C scale as a pattern and can travel through it very quickly, but try and slow down and let your mind take control of your playing again. 

To make it easy, find C with your index finger then move to D with your ring finger, then play E with your index finger and STOP! 

Think to yourself, the scale is C D E F G A B C then add the steps 2+1, 3+1.  Calculating that you have already played the whole steps in the first part of the scale, that leaves you with only one choice; playing the fret next to the E--no guessing involved!

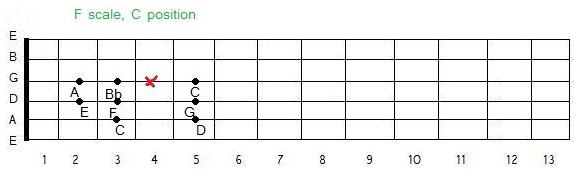
Now let me show you the G scale in the same position.  Let me call this G scale, C position.
Like I said before, you do not have to play the scale in order for it to be a G Scale, you just need to pick up the sharp in the scale you intend on playing, in this case the F#.


Just in case there are any skeptics out there, the G scale played in the form above picks up the F# on the D string, just like I do by altering the steps in the C scale position.  In other words, this G Scale is typically played because it keeps the steps 2+1, 3+1; but mine is 3+1, 2+1.


Now here are the rest of the scales in the C position. Though I am grown now, I feel like at any moment my mom is going to walk in, place her hands on her hips, and ask disgustedly, "young man, are you altering scales again?"  Maybe I shouldn't be, but it is so . . . much . . . fun! 


*Here is a playing tip: do not get bogged down with your finger position, or start to memorize the finger placement, instead focus on counting the steps. *


Now let us take our new found knowledge out for a walk.  Here is the C crossing four strings. Notice that the A and D string notes are played on the same frets, and that those frets match up with the frets having inlays on your guitar.  Someone once told me that those dots, squares, skulls, or whatever is inlayed on the neck of a guitar were not useful; well, what do they know!


Here is the G scale, remember just pick up the F# in the C scale.


If you want to you can do this to the rest of the scales. I have found these two work out best, but the D and F scales are also noteworthy of doing this too.


3D Scale
If you think about the scales as a Rubix Cube, but instead of a cube you would have an octagon giving a side for all of the eight notes on the major scales to lay on, then you would have what I call the 3D Octagonal Scale.


Each octagon is movable, meaning each rotates freely from the other. Here you can see them all lined up, you would only need to count the steps to see which notes were sharped or flatted in each scale, but for now let us focus on the C scale.  If you were able to buy this at the store you would probably get it all lined up like this, but if you have kids, and I do, they would be able to muddle up the order for you very quickly.  I say hand it to them and let them change the order.


Here is what happens.  The notes stay the same but the order gets changed. The picture on the left is the C scale in order, and the one on the right is the C scale mixed up.  Learn the scales in order, but take that 3D Octagonal Scale and give each section a good spin and create many different ways to traverse the notes.


Their is no Guitar Idol show out there yet, that I know of, but if there was I can guess what the judges would say to someone who learned the scales and continued playing them in the same order, "It just sounded scalely."  That is something we should all strive to overcome. We do not want to ascend and descend, then ascend only to descend the scale again. (Now on a playing note, don't refuse all of the order, because EFG, BCD, and ABC just sound good as quick transitions to your root note).


Friday, March 25, 2011

Major Scales and Steps

Most people, when hearing the word scales, get a little sleepy eyed.  I understand the feeling; for a long time, I thought them boring as well, but now I find them important to my playing.

When you think about scales, you probably worry where your fingers will go on each string.  Maybe you have played a few, maybe not, but playing them is only a piece of a large puzzle.  


Whether you know it or not, scales form the base of all we do in music. They help us determine Keys, Patterns, Chords, and so much more.  This lesson on scales is not done on the guitar first, it is more of a brain strain, but like I said before, mind over guitar is the way to success. 

Let us start with the C major Scale.  If you know it already then great, if not here it is:

                         C    D    E    F    G   A   B   C
                         1     2     3    4    5    6    7    8

At some point you will want to memorize it forward and backward.  This should be easy if you know the alphabet, and I bet you do!  Next we need to add how many steps are between each note/letter.


Steps are counted by adding the amount of frets traveled to reach the next note.  Each fret is a 1/2 step, so two frets, naturally equal 1 whole step.   Let's look at the C major scale on the B string so we can see the steps easier. 


Here are the answers:  C and D are two frets apart so we count the distance as 1 whole step. The same goes for D and E, but from E to F there is only one fret so they are a 1/2 step apart.  Now for the rest:  Whole step (F to G), Whole Step (G to A), Whole step (A to B), Half step (B to C).  Do not at this point grab your guitar and see how it sounds because that does not matter, instead focus only on the steps.  (On a side note, if you are still itching to play it, when playing leads, we do not use the base scale forms--they are the system to create the lead patterns that take riffs and licks into the useful dimension.  But learning the patterns before the scales creates holes in our learning and makes us keep asking, Where do my fingers go?)


*For me I split the scale at the F, making it 2 whole steps, 1 half step - 3 whole steps, 1 half step, but while playing I think of it as 2+1, 3+1.*


Now we need to build our note vocabulary.  Let me refer back to the C major scale; C,D,E,F,G,A,B,C.  As we saw earlier with steps, there are many frets that would not get played, rather just skipped over.  From C to D is 1 whole step (2 frets), but what is the note 1 fret away from C (1/2 step).  This note is called a Sharp and would be notated as C#.


Sharps are the notes found when moving up the scale half a step (for us guitarists that means up1 fret) , but  what happens if we sharp C#? It simply turns into D.  I think of this in terms of measurements:  1/8 inch is equal to 2/16 and 2/8 is equal to a 1/4, both 2/16 and 2/8 would be correct mathematically, but not properly used.  The same goes here, C# sharped is never said, but it is mathematically correct.


Flats are the notes found when moved down the scale half a step, so D moved down 1 fret is D flat, notated like this Db. The tricky part is that Db is the same as C#, and is used both ways.  Here is a chart to help you visualize it.  Notice that F and C do not have flats, and B and E do not have sharps. 


Your goal in this lesson is to fill in the chart below by remembering the steps between each note on the C scale.  The other major scales use the same pattern: 2 whole 1 half, 3 whole 1 half.  Look at the note line above and follow the steps in this E major scale as an example; E F# G# A B C# D# E.   First use the line, but try to fill the chart in later by memory.  And, by the way, on the chart the scales line up vertical and across--that is how you will know you did it right.


Here are the answers:


C   D   E    F    G   A  B    C

D   E    F#  G   A   B  C#  D

E   F#  G#  A   B   C# D#  E

F   G    A   Bb  C   D   E    F

G   A    B   C   D    E   F#  G

A   B    C#  D   E   F# G# A

B   C#  D#  E   F# G# A# B

C   D    E    F    G   A   B   C


PS.  Congratulations, you just learned the major scales.


Sunday, March 20, 2011

Mind Over Guitar . . .

One of the greatest things about the guitar is that, if you put in the time, you can play the guitar, and play it well, without ever knowing that scales exist.  A minimal amount of knowledge of music, as it pertains to this instrument, allows you to mimic songs, riffs, and licks you like through memorization.  A good memory will build a wide repertoire of chords and songs, and, with a little experimentation thrown into the mix, you find yourself inventing "new" ways of playing the songs you have memorized.  You may or may not be able to dazzle an audience, but you will be able to answer "yes" to the question: Do you play?

I know this type of playing all too well, and through the years, I have learned that you get out of  the guitar what you put in, and I'm not just talking about those long lost picks that magically reappear out of the sound hole.  The time spent memorizing chords is time well spent, but the time experimenting without scales is unfortunately, more often than not, a waste. Experimentation is not something to completely frown upon, it is the creative genius, but without guidance along the neck it is like finding try to find a needle in a haystack.

This unfortunately is how I started to learn to use the notes along the neck.  I would start by placing a finger here, then another there and just one more finger for good measure, cross my toes and strum.  If it sounded good, I memorized the position, if it did not, I chucked it and tried to reconfigure my fingers to find that lucky spot. Though this is not the way I would wish anyone to learn, it was not all bad.  In a way, it gave me my style of playing, but learning by trial and error was a completely ineffective way to decode the neck, and, to say the least, it was time consuming. 

Looking back it was the thrill of the hunt that kept me experimenting, but with just a little knowledge of scales, I would have been able to progress faster and become a more guided player.  I wrote many songs by trial and error so all is not lost in this way of learning, but with the added knowledge of scales and chord building, I have grown more confident in my playing. 
 
Scales allow us to systematically experiment successfully with our guitars, and instead of reinventing the wheel, we can dig into the steps already built in to music that allow us to have playability.  What the audience doesn't see while we are playing keeps them guessing and asking, "How do they do that?"  This happens I believe because playing is made up of about 40% of what is seen and 60% of what I call "smoke and mirrors."   Mind over guitar is the way to success!